
Windows 10 strikes again
There is no peace for Windows 10 users: as indicated by ComputerBase, the two updates KB5001330 (dedicated to systems with Windows 10 20H1) and KB5001337 (for Windows 10 1909 and 1903), already protagonists of problems related to shared folders and DNS (we talked about it here), would also cause some users to drop FPS in games and, in severe cases, blue screens.In addition to the drops in FPS, some gamers have also complained about a highly unstable framerate when sharing the screen on Discord, but it is not clear if the problem is strictly related to Windows 10 updates, a software update or a combination of the two.
Other users have stated that they have encountered constant reboots, as well as having the DNS problems mentioned in the opening. Still others have stated that they cannot even complete the update as the procedure stops responding at a certain percentage, but given the way things are, maybe it's for the best.
What is probably the most serious problem, however, is linked to the deletion of the user's files. As reported by Windows Latest, it seems that the two Windows 10 updates KB5001330 and KB5001337 reintroduce the so-called "Temporary User Bug", which caused the deletion of the login and all the files in the user folder such as images, documents and more.
If you haven't installed the two updates yet, our advice is obviously to avoid doing so. If, on the other hand, "it's too late" and you have encountered some of the problems described above or you don't want to take any risks, you can uninstall the update: just go to settings -> updates and security -> view update history. Here you will find the option to uninstall the KB5001330 or KB5001337 update, depending on the version of Windows 10 you are using.
As always we expect Microsoft to fix the problem quickly, but historically (barring exceptional cases) it never takes less than two weeks: we advise you to suspend updates for this period of time, pending that the company will solve the problem or issue a fix.
Are you looking for a Microsoft Office license for a few euros? You can find it on Amazon!
10-Strike Network Scanner lets you scan and monitor network IP
If you have multiple computers which have different IP addresses, it is quite difficult and time-consuming to monitor all the IP address and their corresponding information if you want to do so. To solve that problem and save your valuable time, you can start using a tool called 10-Strike Network Scanner, which is free, easy to use, and shows a lot of information in one panel. Let’s take a look at this tool today.
10-Strike Network Scanner can be considered as a compact version of Advanced IP Scanner. However, it shows almost all the information that the other tool does. Talking about available functionalities, here is what you can expect from this tool.
To start using it, download it on your computer and install it on your computer. After installing and opening it, you will see a window like this-

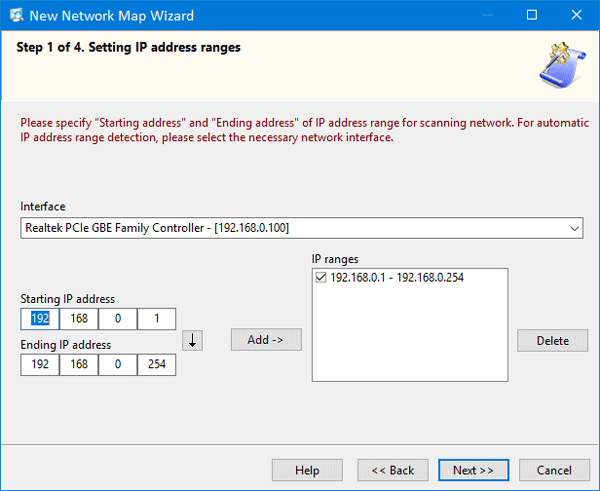
Here you can enter an IP range, to find out information about all the IP address you have in a network. So select the first option and click the Next button.
After that, you need to enter an IP range. Enter that and click the Add and Next buttons.
In the next window, you can select various things like ICMP ping, ARP ping, TCP ping (it take comparatively more time than others), etc. You can also select various options such as:
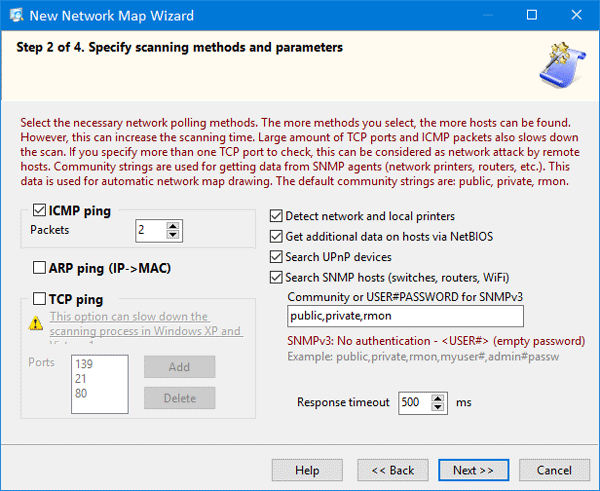
Select the option/s as you want and click the Next button again.
It may take several minutes to scan the whole network if you have a big IP range. Otherwise, it scans around 100 IPs within 3 minutes. After completing the scan, you can see the results:
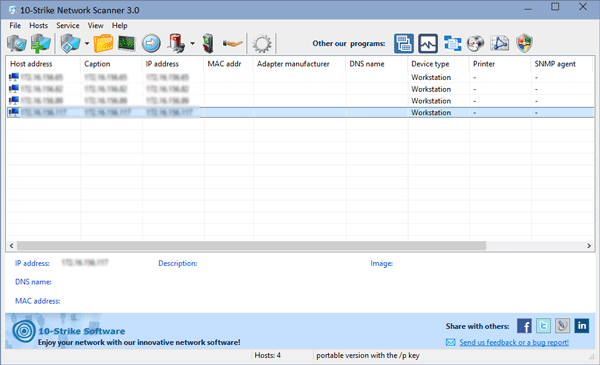
From here, you can gather all the information as mentioned earlier.
Ping host
If you want to ping any host to check the current status, you need to click the corresponding button. After that, you can choose the number of ping requests, packet size, response timeout, etc.
Check system information
If you want to check the system information, right-click on an IP address > select System Information. It is possible to find out the account the IP is using, event log, SNMP information, Ethernet card vendor, registry files and so on. Apart from that, you can find out the OS the computer is using, currently installed network driver, unit uptime and so on. If you want to gather the MAC address, that is possible as well.
Export to CSV
Let’s assume that you have got all the information you want and you want to export it to a spreadsheet. For that, go to File > Export to Excel. Following that, you need to enter the location where you want to save the file and choose a name for your file.
Considering everything, 10-Strike Network Scanner seems to be a handy tool, when you have a small network. If you like it, you can download this tool from here.